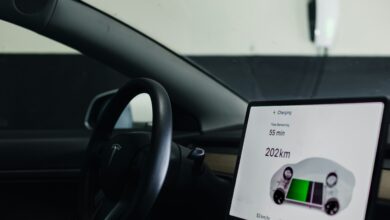
The transition to electric mobility often leads homeowners to consider the convenience and cost-effectiveness of installing a dedicated charging station in their own garage or driveway. While the prospect of waking up every morning to a fully charged vehicle is incredibly appealing, the technical process of setting up a high-voltage charging system requires a deep commitment to safety and precision. Dealing with residential electricity at the levels required for modern electric vehicles (EVs) is significantly different from plugging in a standard household appliance. A typical EV charger draws a heavy electrical load for several consecutive hours, which can place immense stress on an outdated or improperly configured home electrical panel.
Without the right knowledge, a DIY project can quickly turn from a convenient upgrade into a serious fire hazard or a risk for electrical shock. Therefore, understanding the fundamental principles of electrical load, wire gauging, and local building codes is absolutely non-negotiable for any DIY enthusiast. This comprehensive guide is designed to walk you through the essential safety protocols, hardware requirements, and best practices to ensure your home charging setup is both efficient and secure. We will cover everything from the initial site assessment to the final testing phases, providing you with a roadmap for a professional-grade installation. Safety should always be the foundation of your innovation when it comes to powering the future of your transportation.
Assessing Your Home’s Electrical Capacity

Before you purchase a single piece of hardware, you must determine if your home’s electrical system can handle the additional demand of an EV charger. Most modern Level 2 chargers require a dedicated circuit, usually 240 volts, which can pull between 32 to 48 amps of current continuously.
A. Calculating Total Household Load
You need to evaluate the total amperage of your main electrical panel to see if there is enough “headroom” for the charger. If your panel is rated at 100 amps and you frequently run an electric oven, dryer, and air conditioner, you may need a service upgrade to 200 amps.
B. Inspecting the Condition of the Main Panel
Look for signs of wear such as corrosion, burnt smells, or flickering lights in the house when large appliances turn on. If your panel uses old-fashioned fuses instead of modern circuit breakers, a full replacement is mandatory for EV safety.
C. Identifying the Correct Circuit Breaker Slot
A Level 2 charger requires a double-pole circuit breaker, which takes up two adjacent slots in your panel. Ensure your panel has the physical space available and that the bus bars are in good condition to handle the high-heat load.
Choosing the Right Charging Hardware
Not all EV chargers are created equal, and selecting the right equipment is a critical safety decision. You must ensure that the hardware you choose is compatible with your vehicle and specifically rated for the environment where it will be installed.
A. Prioritizing UL or ETL Certification
Always look for a safety certification mark from a nationally recognized testing laboratory like Underwriters Laboratories (UL). These marks ensure the device has been rigorously tested for fire safety, electrical surges, and weather resistance.
B. Matching Amperage to Your Vehicle’s Capacity
Buying the most powerful charger available isn’t always the best move if your vehicle can only accept a lower charge rate. Match the charger’s output to your car’s onboard charger to avoid paying for excess capacity you cannot use.
C. Weather Rating for Outdoor Installations
If you are installing the charger outside, ensure it has a NEMA 3R or NEMA 4 rating. These ratings indicate that the housing can protect the internal electronics from rain, snow, and extreme temperature fluctuations.
Selecting High-Quality Wiring and Conduit
The wire is the most vulnerable part of a DIY installation because it carries the heat generated by the electricity. Using the wrong gauge of wire is a leading cause of electrical fires in home EV setups, as the insulation can melt under constant load.
A. Determining the Correct Wire Gauge
For a 40-amp charger, you generally need 8-gauge or 6-gauge copper wire, depending on the length of the run. Thicker wire (lower gauge number) is better for longer distances to prevent voltage drop and excess heat buildup.
B. The Importance of Using Conduit
Electrical codes generally require that high-voltage wiring for EV chargers be protected inside a conduit, such as EMT or PVC. Conduit prevents physical damage to the wires from pests, gardening tools, or accidental impact in the garage.
C. Choosing High-Temperature Insulation
Ensure your wires are rated for at least 75°C or 90°C (such as THHN or THWN-2). This rating ensures the insulation won’t degrade over time as it sits in the heat generated by hours of continuous charging.
Safe Installation of the Charging Unit
Once you have your supplies, the physical installation must be done with extreme attention to detail. Every connection must be tight and secure, as “loose” connections are a primary source of electrical resistance and heat.
A. Secure Mounting to Wall Studs
EV chargers are heavy and the charging cables can be bulky and difficult to move. Always mount the unit directly into wooden wall studs or use heavy-duty masonry anchors to prevent the unit from falling off the wall.
B. Torqueing Terminal Screws to Specification
Most manufacturers provide a specific torque setting (measured in inch-pounds) for the wire terminals. Using a torque screwdriver ensures the connection is tight enough to prevent arcing but not so tight that it damages the wire strands.
C. Proper Grounding and Bonding
The charger must be properly grounded to the home’s electrical grounding system to prevent shocks in the event of a fault. Never bypass the ground wire, as it is your primary safety net against lethal electrical levels.
Implementing Ground Fault Protection
A Ground Fault Circuit Interrupter (GFCI) is a life-saving device that shuts off power instantly if it detects electricity leaking where it shouldn’t. Modern EV chargers often have this protection built-in, but the circuit itself may also need protection.
A. Internal CCID Protection in Chargers
Most Level 2 stations include a Charge Circuit Interrupting Device (CCID), which monitors the flow of electricity to the car. This provides an immediate shutdown if the cable is damaged or if water enters the connection.
B. GFCI Breaker Requirements
In many jurisdictions, if you are installing a “plug-in” charger using a NEMA 14-50 outlet, you must use a GFCI circuit breaker. This adds an extra layer of protection for the outlet itself, though it can sometimes cause “nuisance tripping” with some chargers.
C. Testing the Interrupting Device Regularly
Just like the test button on your bathroom outlet, you should use the test function on your EV charger periodically. Ensuring the safety shut-off still works is a quick task that provides significant peace of mind.
Managing Heat and Ventilation
EV charging produces a significant amount of heat, both in the charging unit itself and within the vehicle’s battery. Managing this thermal energy is essential for the longevity of your equipment and the safety of your home.
A. Ensuring Airflow Around the Charger
Never mount a charger in a tight, enclosed cabinet or cover it with rags or tools. The unit needs at least a few inches of clearance on all sides to dissipate heat naturally into the air of the garage.
B. Handling the Charging Cable Properly
Never leave the charging cable coiled up tightly while the car is charging. An uncoiled cable allows heat to dissipate along its entire length, whereas a coil can act as an induction heater and melt the insulation.
C. Monitoring Ambient Temperatures
If your garage becomes extremely hot in the summer, consider charging your vehicle at night during cooler hours. High ambient temperatures can cause the charger to “thermal throttle,” reducing your charging speed to protect the internal components.
Proper Outlet Installation for Plug-In Models
Many DIYers choose a plug-in charger because it is easier to replace or take with them if they move. However, the outlet used for these chargers (usually a NEMA 14-50) must be of “industrial grade” to handle the constant load.
A. Avoid Cheap Residential Outlets
Standard outlets found at big-box hardware stores are often designed for dryers, which run for 45 minutes, not EVs that run for 8 hours. Invest in a high-quality, industrial-grade outlet that has better clamping pressure on the plug blades.
B. Correct Orientation of the Outlet
Install the outlet so that the heavy charging cable hangs naturally without putting “leverage” or strain on the plug. If the plug is pulling out of the outlet even slightly, it can cause a poor connection and a potential fire.
C. Hardwiring as the Safer Alternative
If you plan to stay in your home for a long time, hardwiring the charger directly into a junction box is technically safer. It eliminates the plug and outlet as potential points of failure and allows for higher charging speeds in many cases.
Outdoor Safety and Environmental Hazards
Installing a charger outside brings a whole new set of challenges, from moisture management to protecting the unit from physical tampering or sunlight damage.
A. Using Liquid-Tight Fittings
All conduit connections for outdoor chargers must be sealed with liquid-tight connectors and gaskets. This prevents rain and humidity from seeping into the electrical boxes and causing short circuits or corrosion.
B. Protecting the Unit from Direct Sunlight
Constant UV exposure can make the plastic housing of a charger brittle over time. If possible, install the unit on a north-facing wall or under a small protective eave to keep it in the shade during the hottest parts of the day.
C. Cable Management to Prevent Tripping
Outside, a loose cable can become a tripping hazard or be damaged by a lawnmower. Always use a dedicated cable holster to keep the cord off the ground and neatly coiled when the vehicle is not being charged.
Final Testing and Inspection Protocols
The most important step of a DIY project is the final verification. You should never assume the system is safe just because the green “power” light turns on; you must test the electrical integrity of the entire circuit.
A. Using a Multimeter for Voltage Checks
Before plugging in your expensive car, use a multimeter to verify that the outlet or hardwired connection is providing a stable 240 volts. Check the voltage between the hot wires and from each hot wire to the ground.
B. Checking for “Hot Spots” During the First Charge
During the first hour of the first charge, stay nearby and check the temperature of the circuit breaker and the outlet. If anything feels hot to the touch (rather than just slightly warm), shut off the power immediately and check your connections.
C. Obtaining a Professional Electrical Inspection
In many areas, an electrical permit and inspection are required by law for EV charger installations. Even if you did the work yourself, having a licensed inspector verify your work is the best way to ensure your insurance policy remains valid.
Long-Term Maintenance for Your Charging Station
An EV charger is not a “set it and forget it” device; it requires occasional maintenance to ensure it remains safe over years of use. Environmental factors and daily wear can slowly degrade even the best installations.
A. Inspecting the Charging Handle and Pins
Check the J1772 or NACS plug regularly for any signs of charring, melting, or bent pins. A damaged plug can cause a poor connection with your car’s charging port, leading to high heat and potential damage to the vehicle.
B. Tightening Connections Every Few Months
Thermal expansion and contraction can cause screws in the electrical panel or the charger to loosen over time. Every six months, turn off the power and ensure that all terminal screws are still tightened to the correct torque.
C. Cleaning the Unit and Cable
Wipe down the charger and cable with a damp cloth to remove dirt and grime. Avoid using harsh chemicals or high-pressure water, as these can damage the seals and enter the electronics housing.
Conclusion

Successfully installing your own home EV charger is a rewarding project that combines technical skill with long-term utility. Every safety decision you make today protects both your home and your significant investment in an electric vehicle. The difference between a safe installation and a dangerous one often comes down to the quality of the connections and the gauge of the wire. Always respect the power of high-voltage electricity and never take shortcuts when it comes to grounding or circuit protection.
If at any point you feel unsure about a technical step, do not hesitate to consult with a licensed professional electrician. Permits and inspections are not just bureaucratic hurdles; they are vital tools for ensuring your work meets modern safety standards. A well-installed charger provides a seamless and worry-free experience that enhances the joy of owning an electric car. Education is the best defense against the common mistakes that lead to electrical failures in DIY projects. Regular maintenance and inspections will keep your charging station running safely for many years to come. Your home is your sanctuary, and your charging setup should be designed to keep it that way.
The future of transportation is electric, and a safe home setup is the foundation of that transition. Take pride in doing the job correctly, using only the highest-rated materials and the best tools available. As battery technology evolves, your home’s electrical infrastructure will remain a valuable asset for your family. Safety is not just a checklist; it is a mindset that prioritizes long-term reliability over short-term convenience. We are all pioneers in this new energy landscape, and setting high standards for safety helps the entire community. May your DIY journey be a successful one that brings efficiency and sustainability to your daily life.